In-Depth
iPhone Dev How-To: Working With Application Settings In Monotouch
A step-by-step tutorial on working with application settings when using Novell's Monotouch for iPhone and iPad development.
- By Bryan Costanich
- April 17, 2010
When you build an application of any complexity, often you quickly realize a need to allow users to set preferences and settings for how the application is configured and behaves. In Mac programs, these are usually found in the menu under the program name and then Preferences. In Windows, it's often under Tools:Options.
iPhone and iPad applications are no different in the need for application settings and preferences; however, the way users set preferences can be slightly different. In iPhone and iPad applications, there are usually two ways to set preferences. First, you can provide your users a screen or set of screens in the application to change settings, and second, Apple gives us a special application called Settings that allow users to edit preferences when their application is not running.
Apple's recommendation is that, generally, for settings that are set once for the lifecycle of the application, you use the Settings Application, and for things that change often, or that the user may need to change while using the application, provide users with an interface within the application for those settings.
Let's say that you're building an e-mail application, for instance. Account settings like username and password would probably go into the Settings Application, whereas if you allowed your users to change between application skins, you would probably put that inside the application.
You can find the Settings Application on the home screen of your device. If you've used your device much at all, you're probably familiar with this screen. If you scroll down in it however, you'll see that there are also application-specific settings.
While there are generally two ways for the user to configure settings, as a developer, Apple provides us a single, unified API in which to retrieve and persist them. So whether the user configures a particular setting in the Settings Application, or within your application, you still access it the same way. This means that you can even allow the user to configure a particular setting in either location.
You get the Settings Application UI for free with your application as part of the iPhone OS, but you have to create and configure a special XML file (which we'll run through in a moment) that tells the Settings Application what to show to configure. You can still use the API to save settings, even if they're not in this XML file, but they will only show up the Settings Application if they're in the file.
Ok, enough talking -- let's see this in action.
Sample Application
So let's create the application. First, open up MonoDevelop, it should look something like the following:
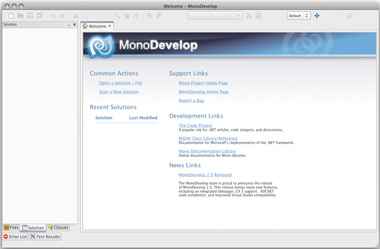
[Click on image for larger view.]
|
Next, create a new iPhone MonoTouch project. To do this, select File:New Solution:
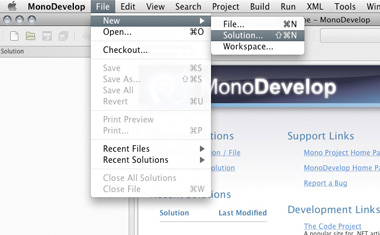
[Click on image for larger view.]
|
Choose iPhone Window-based Project from the C#, iPhone templates and let's name our solution "Example_AppSettings":
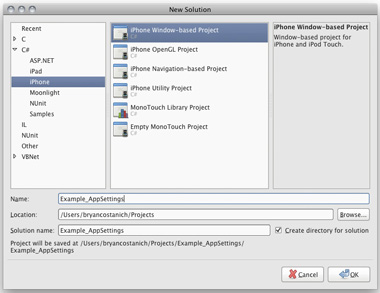
[Click on image for larger view.]
|
Click OK on the Project Features dialogue, as they're not relevant to what we're doing:

[Click on image for larger view.]
|
Our project should now look something like this:
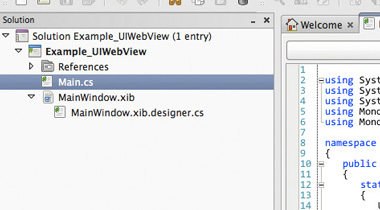
[Click on image for larger view.]
|
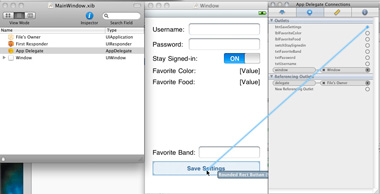
Double-click on MainWindow.xib to open it up in Interface Builder. Drag controls from the Library Window and add them to the designer so that it looks something like the following:
To change the text of the UILabel controls, simply double-click them and type in whatever text you want. Note that the [Value] label controls are separate from the Favorite Color: and Favorite Food: label controls, and that "[Value]" is just text.
Next, add the following outlets to the AppDelegate class:
- txtUsername
- txtPassword
- swtchStaySignedin
- lblFavoriteColor
- lblFavoriteFood
- txtFavoriteBand
- btnSaveSettings
To add the outlets, click the Classes tab at the top of the Library Window, and select AppDelegate from the Library drop-down. Then click the Outlets tab at the bottom half of the window, and click the + button to add delegates. When you're done, it should look like:
After you've created your outlets, wire them up to the following controls:
To do this, make sure App Delegate is selected in the Document Window, then in the Connections Inspector, drag the outlet to the appropriate control:
[Click on image for larger view.]
|
After you have the outlets wired up, change the Return Key to Go for each of the text fields. You can find this in the Attribute Inspector, when the UITextField control is selected in the designer:
Ok, we're done in Interface Builder, so let's switch over to MonoDevelop. Add a new folder to your project, by right-clicking on it and choosing Add:New Folder. Then right click and choose Rename, and name it "Settings.bundle:"
The iPhone OS is case-sensitive, so make sure the case is correct. Our Settings.bundle folder looks like an ordinary folder in MonoTouch, but if we look at it in Finder, we see that it's actually treated as a special file:
Bundles are actually kind of like .zip folders. They can contain other files and folders, however, Finder hides that from us by default. If we want to see what's in a .bundle, you can right click on it and choose Show Package Contents.
Now that we have our Settings Bundle, we need to add a property list file to it. The iPhone looks for a file called "Root.plist" to find it's main settings screen. You can have other screens as well, each one gets it's own property list file, as we'll see later, but the first one must be called Root.
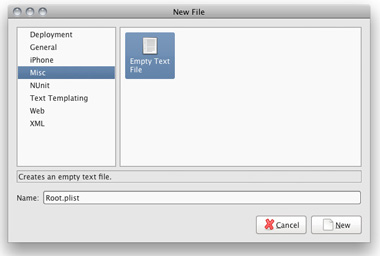
Right-click on your Settings.bundle folder and choose Add:New File and select Misc:Empty Text File, and name it "Root.plist:"
[Click on image for larger view.]
|
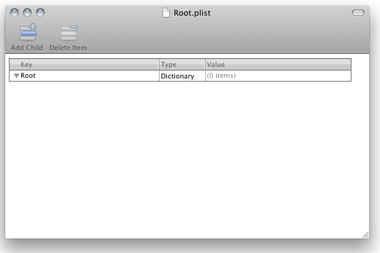
As soon as you create this file, it'll probably open up in XCode's Property List Editor:
[Click on image for larger view.]
|
The first thing we need to do is save this as XML. This is very important. If you're building regular Mac applications, this file doesn't need to be XML, but for the iPhone it does. If you don't save it as XML, you settings won't work. Choose File:Save As and then XML Property List:
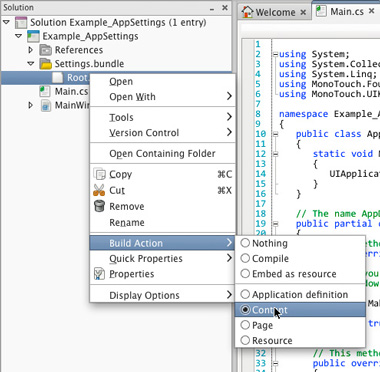
We're going to edit this property list file in just a bit, but before we forget, we need to do another important step, we need to change the Build Action on our Root.plist file to Content. If we don't set it to Content, then it won't get included as a file in our application. To change the build action, right click on the file and select Build Action:Content:
[Click on image for larger view.]
|
Ok, now that we've got those details out of the way, let's go back over and work on our property list file.
Before we edit our list, let's take a look at what kinds of things we can put in there. The Settings Application supports a fairly robust set of items:
- Group – Adding a group combines a set of items into a grouped table. You can set the title that shows up for the group.
- Text Field – A simple text field where the user can enter a string of text. You can give this a password effect by marking it as IsSecure, and it will hide the characters.
- Title – A read only line of text that has a title and text.
- Slider – A slider control. You can specify things like the maximum and minimum image, the default value, and the minimum and maximum values.
- Toggle Switch – A boolean (on/off) toggle switch control. Also has a title.
- Multi-Value – A multiple value option where if you click on it, it opens a new screen and allows you to make a choice from different values.
- Child-Pane – Gives you another, nested, settings screen on which you can put any of these items on. For each child pane, you need an associated .plist file.
In our example application, we're going to use quite a few of these.
As we edit our .plist file, it's important to note, no validation is performed in the editor, so you need to make sure you type everything correctly, as mistakes will not be readily apparent in the editor, your settings just won't work.
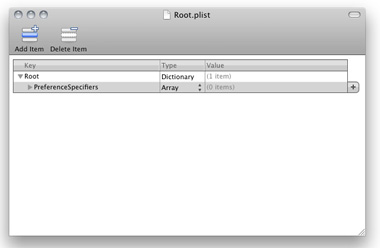
Because we named our file Root.plist, the first node in there is "Root." The Settings Application looks for a node called PreferenceSpecifiers, of type Array, under the Root node, so lets create one.
Select the Root node and click the Insert Child (  ) icon to the right of the node row. Name this node "PreferenceSpecifiers," and change it's type to Array. Your file should look like the following:
[Click on image for larger view.]
|
We're going to add some children to this. If you click the arrow to the left of the PreferenceSpecifiers row, the Add Sibling Item (+) button should change to an Insert Child Item button and allow us to add children.
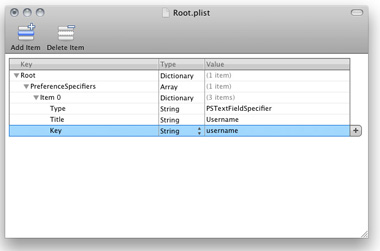
Each setting node that we add under PreferenceSpecifiers will be a Dictionary of key/value pairs. If you recall our main screen, the first thing we have on there is "Username," so let's add that first. Add our Dictionary type node to the PreferenceSpecifiers node, and then add the following children under it:
| Name |
Data Type |
Value |
| Type |
String |
PSTextFieldSpecifier |
| Title |
String |
Username |
| Key |
String |
username | |
When you're done, your plist file should now look like this:
[Click on image for larger view.]
|
The Type node tells us what kind of control to display. In this case, we're just putting in a text field, so we use the PSTextFieldSpecifier. Our allowed types are:
- PSTextFieldSpecifer – Maps to the Text Field item.
- PSGroupSpecifier – Maps to the Group item.
- PSTitleValueSpecifier – Maps to the Title item.
- PSToggleSwitchSpecifier – Maps to the Toggle Switch item.
- PSSliderSpecifier – Maps to the Slider item.
- PSMultiValueSpecifer – Maps to the Multi-Value item.
- PSChildPaneSpecifer – Maps to the Child Pane item.
NOTE:For a complete description of all these fields and associated schema, check out the Settings Application Schema Reference document up on the developer.apple.com site.
Next, the Title node specifies the text for the setting label, and the Key specifies the dictionary key name that we'll use later, in code, to retrieve the value.
Ok, after you've got that one in, we're going to add a few child more nodes of PreferenceSpecifiers. First, create the Password just as we did the Username, but with the following values:
| Key Name |
Value Type |
Value |
| Type |
String |
PSTextFieldSpecifier |
| Title |
String |
Password |
| Key |
String |
password |
| IsSecure |
Boolean |
True (Checked) | |
Password had the same fields as Username, except for the IsSecure field. IsSecure makes the text field not show the entered text.
Next, let's do StaySignedin:
| Key Name |
Value Type |
Value |
| Type |
String |
PSToggleSwitchSpecifier |
| Title |
String |
Stay Signed-in |
| Key |
String |
StaySignedin |
| DefaultValue |
Boolean |
True (Checked) | |
In StaySignedin, we've added DefaultValue. This was available on the other settings as well, but makes more sense here, because we want to provide a default choice.
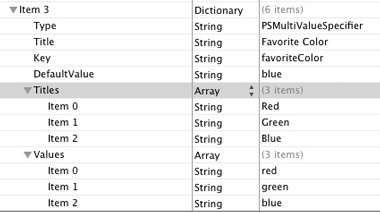
Next, we're going to do Favorite Color, and we're going to make this a multi-value selector. This one is a little more complicated. We have to specify an array of item titles to display and an array of their values:
[Click on image for larger view.]
|
The rest, however, is just like before.
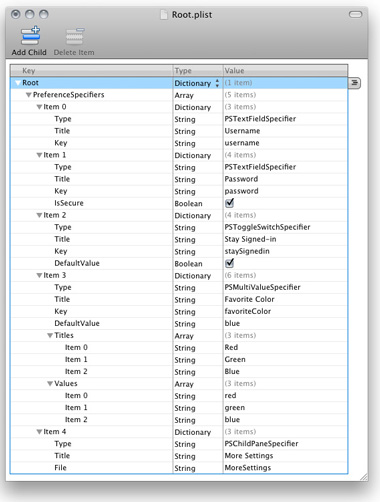
Ok, the last one is Favorite Food, and we're going to put that on a child pane. Child panes allow you to have a group of items that you configure on another screen. For this one, enter the following values:
| Key Name |
Value Type |
Value |
| Type |
String |
PSChildPaneSpecifier |
| Title |
String |
More Settings |
| File |
String |
MoreSettings | |
There is a new key here, File, which specifies the name of the .plist file (minus the file extension) that contains the child pane settings. For every child pane, you will need an associated settings file. Our completed plist file should look like this now:
[Click on image for larger view.]
|
You don't actually have to use the Property List Editor if you don't want. This file is just a standard XML file, so you can open it in any text editor. In this case, our completed file actually has the following content:
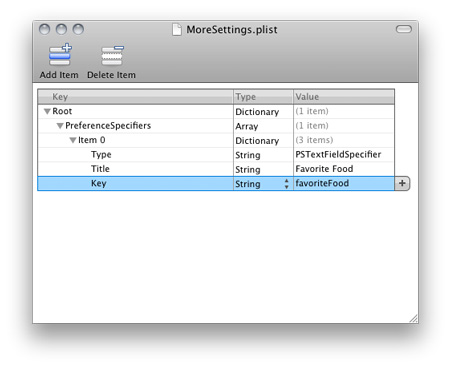
Now we need to go and create our MoreSettings.plist file. Do this as you did before, right click on the Settings.bundle folder in MonoDevelop and add a new text file, name it MoreSettings.plist. When it opens up in the Property List Editor, remember to save as XML. Then, in MonoDevelop, make sure the Build Type is set to Content.
This settings file will be very simple, we're just going to put a text field in there for our favorite food:
[Click on image for larger view.]
|
As you can see, we started the file again with a PreferenceSpecifiers node underneath the Root node.
Ok, let's run our app and see if we can see if our settings worked. Select Run:Debug in the MonoDevelop menu, the iPhone Simulator should start up and our app should look something like this:
Click the iPhone's "Home" button, and then go to the home screen in the simulator:
Click on the Settings Application, and you should see our Example_AppSettings app in there:
Select it, and our settings should show up:
If you click on Favorite Color, the multiple-value select screen should come up:
If you click back and then click on More Settings, you'll see the child pane we added:
Pretty neat huh? We got all those screens for free, just by configuring some XML files.
Now that we got all of our settings setup, let's go use them. Switch back over to MonoDevelop and open up the Main.cs file.
The first thing we want to do is add the following method to our AppDelegate class:
Application settings are accessed via the StandardUserDefaults property of the NSUserDefaults object. There are two ways of accessing any setting. You can access the StandardUserDefaults directly as a dictionary, which returns NSObject objects, or you can use helper methods on it to retrieve your settings already cast as a type.
If you access the dictionary directly, you must check to see if the value is null. If you access the data via one of the typed calls, e.g. StringForKey, BoolForKey, etc., you don't have to do a null check first.
In our PopulateSettings method, we simply populate the controls on our screen with our application settings, but I've shown how to access the settings both via the typed assessors and via the straight dictionary call.
Next, add the following method to your AppDelegate class:
This is going to handle our Save Settings button click. Saving our settings is very easy. We simply call the Set[Type] methods on the StandardUserDefaults property. One thing to note here, unlike in other .NET technologies, if a UITextField control's text is empty, the Text property will be null, so we have to do a check before accessing it.
Now that we have our settings retrieval and persistence methods, let's add a handler (again, in the AppDelegate class) that will dismiss the keyboard after editing the text fields:
ResignFirstResponder will dismiss the keyboard that is being used to edit the text box. We'll wire this up in a second.
Next, add the following to the FinishedLaunching method in your AppDelegate class:
Again, this is pretty simple code, we simply wire up our handlers and call our PopulateSettings method so that our page displays our settings.
Ok, we're just about there; we have one final thing to do. When your application runs, if a user hasn't gone into the Settings Application and viewed your application settings, the iPhone OS doesn't initialize your default settings. So even though we specified that the staySignedin value should be true, it will actually evaluate to false if we call BoolForKey to access it.
To get around this, we need to initialize our defaults before their accessed. One of the easiest places to do this is in the AppDelegate constructor. So let's add the following constructor to our AppDelegate class:
The other thing we do in here is call the Init method on StandardUserDefaults. This loads any settings that have been saved. It's important to call it after our defaults have been set, so that any saved changes override our defaults.
Our finished AppDelegate class should now look like this:
Ok, fire up the application and you should see it work. The first time in, defaults should be set:
Exit it, go to the Settings Application and set some settings:
Now, if you launch the application again from the simulator, our settings should show up:
If we set our Favorite Band and save it:
When you open up the app again, your favorite band will still be there.
Congratulations! You now know how to work with application settings in MonoTouch!